Rachael Cooper
Certified yoga instructor (Vinyasa and Hatha Yoga), CYT 200 teacher training certificate
In our previous article, Relieve back pain: 5 Advanced Yoga Exercises, Stretches and Poses, we focused on spinal extension and axial rotation to help range of motion. We also included inversions to help reduce pressure on spinal discs.
In this article, we focus on three muscle groups, the first of which helps spinal flexion, extension, and rotation. The second muscle group we target promotes back strength, alignment, and posture.
The final muscle group we look at directs our attention to the hips and pelvis. These yoga poses help lower back and pelvic stability and improve hip flexion.
Remember to always listen to your body, and work at a pace that feels comfortable and sustainable for you.
Spinal Erectors
The group of muscles closest to the spine consists of three sets of muscles:
- the spinalis
- iliocostalis
- longissimus
These muscles form the spinal erectors, or erector spinae and run parallel to the spinal column.[1] The function of these muscles is to:
- maintain an upright posture
- assist the spinal column in absorbing shock from walking, running and jumping
- facilitate spine movements including flexion, extension, axial rotation and lateral flexion[2]
Back tightness and pain can also be treated effectively by strengthening and stretching the spinal erector.[3]
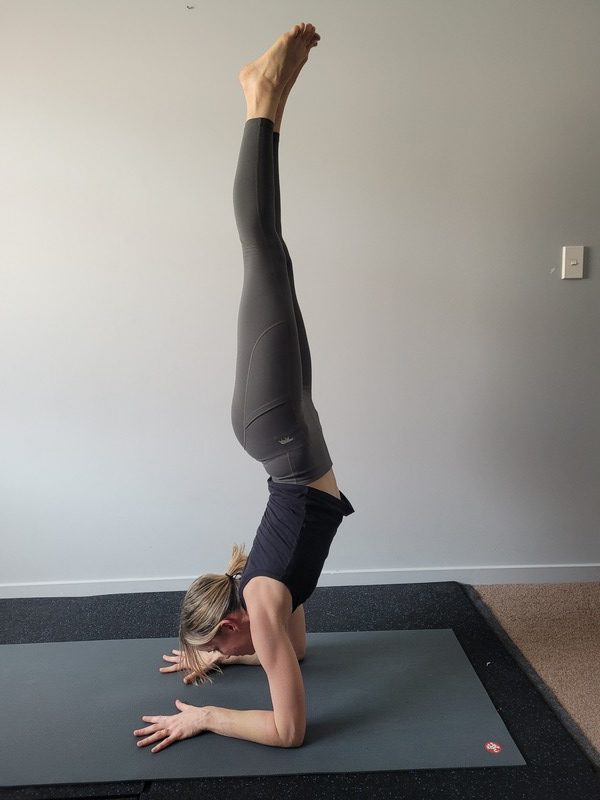
Feathered Peacock — Pincha Mayurasana
Pincha = a feather of a tail, mayura = peacock
Pincha mayurasana is an excellent asana for improving postural alignment by activating the spinal erectors and increasing spinal flexibility. In this pose, the spinal erectors are engaged to maintain spinal extension and prevent the practitioner from falling forward.
Activated spinal erectors help spinal alignment
Activating these muscles reduces the pressure on the cervical and lumbar spine. Moreover, lifting the head away from the floor in pincha mayurasana strengthens the rectus capitis posterior muscles around the C1 and C2 vertebrae.
This supports the head and neck while allowing extension and rotation.[2] This action promotes proper alignment of the upper spine and is beneficial for counteracting the effects of “text neck”, which can cause strain in the neck and upper back muscles.[4]
How to do Feathered Peacock Pose
- Start in a kneeling position. Bend forward and place your elbows, forearms, and palms on the floor, making sure that the distance between your elbows is not wider than your shoulders. Keep your forearms and hands parallel to one another.
- Lift your head and stretch your neck as high as possible.
- Exhale and raise your legs up, attempting to balance without letting them drop behind your head.
- Stretch your chest up vertically and keep your legs together, with straight knees and ankles. Point your toes.
- Engage your leg muscles at the hips and knees, and while balancing, extend your shoulders upwards while keeping your thighs taut. Hold this pose for a minute.
- Lower the feet and knees back to the ground to return to a kneeling position.[5]
Variation of Feathered Peacock Pose
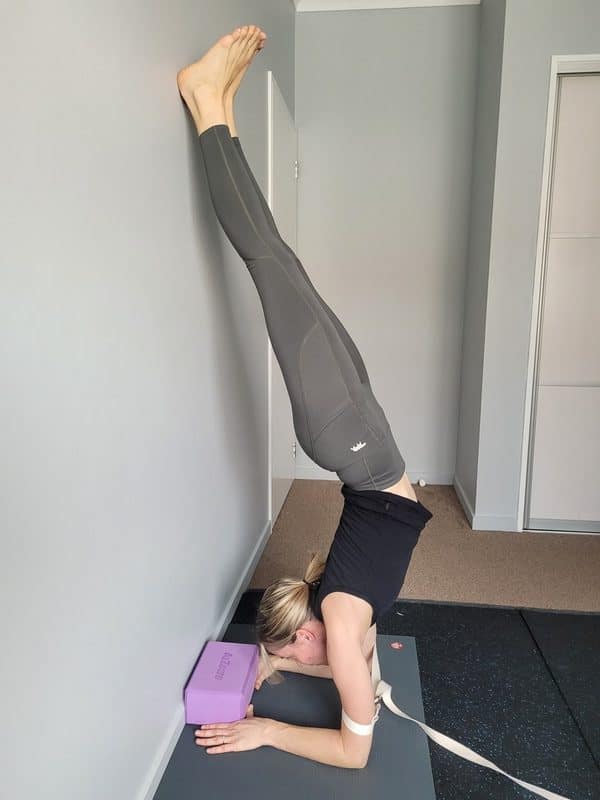
Place a block between your hands and secure a strap around your arms just above your elbows on the ground.
This will help to keep your arms and hands active so your elbows stay in line with your shoulders.[6] Practice against a wall.[5]
Latissimus Dorsi
The latissimus dorsi is the largest muscle in the back and is vital in maintaining back strength and posture.
Along with aiding in shoulder movement, this muscle plays a key role in preventing rounding of the shoulders, which can lead to poor posture.
The latissimus dorsi works in tandem with the pectoralis major to maintain proper spinal alignment and posture.[7]
Stretching these muscles can help release tension that may cause upper back pain and restrict movement, while strengthening them can prevent tension build-up in the area.[8]
Sage Visvamitra — Visvamitrasana
Visvamitra = A sage
This asana moves the spine into lateral flexion, which helps to maintain good health of the spine and surrounding muscles.
The hand reaching for the leg and the upward rotation of the trunk turning away from the lifted leg deepen the lateral flexion, making it an effective stretch for the entire side of the body.[2]
In addition, visvamitrasana is an excellent asana for shoulder stabilisation and posture improvement. The pectoralis major and latissimus dorsi muscles are activated during the pose, which helps to maintain good posture and prevent shoulder injuries.[9]
How to do Sage Visvamitra Pose
- Start in adho mukha svanasana (downward-facing dog).
- Bring the right leg over the right hand and place the back of the right thigh on the back of the upper part of the right arm.
- Turn the trunk to the left and stretch the left leg out long.
- Lift the left arm up and over to stretch and catch the right foot.
- Hold for 20 to 30 seconds.
- Release the right leg and bring the right foot back towards the left foot to return into adho mukha svanasana.
- Repeat on the opposite side.[5]
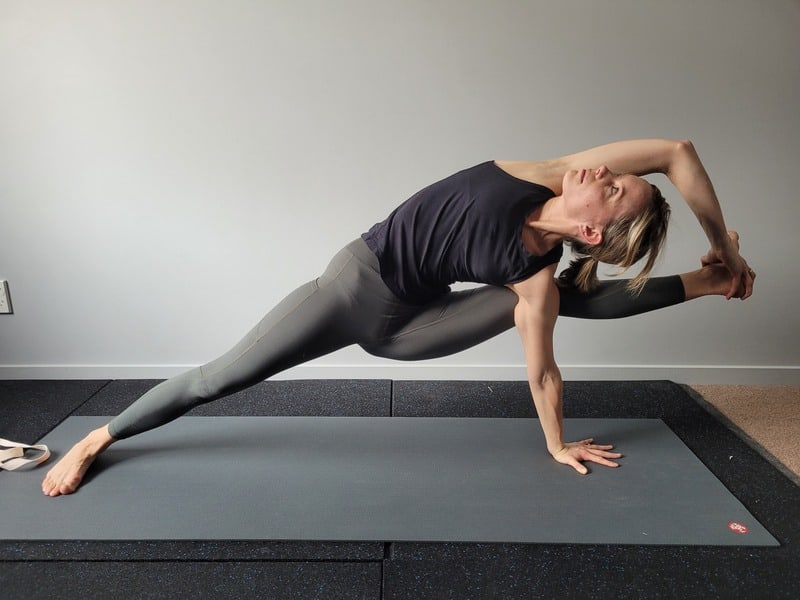
Variation of Sage Visvamitra Pose
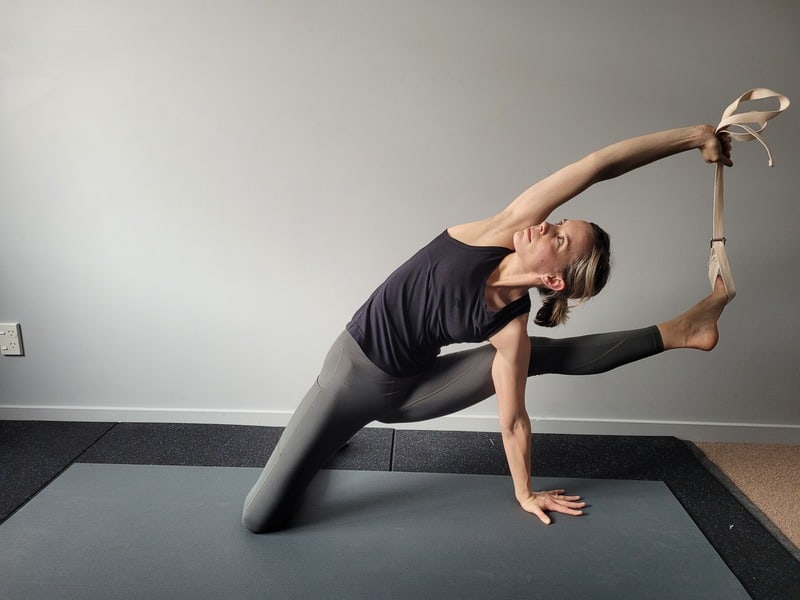
Use a strap to connect the hand to the lifted foot if the shoulder and chest feel tight.
Instead of placing the foot on the ground with the leg stretched out long, place the knee and foot on the ground with the knee in line with the corresponding hip.[10]
Revolved Head to Knee — Parivrtta Janu Sirsasana
Parivrtta = turn/revolve, janu = knee, sirsa = head
Parivrtta janu sirsasana involves both lateral flexion and spine rotation, which leads to an increased lengthening of the latissimus dorsi.
This asana creates openness in the chest, which is beneficial to counteract the hunched position that many of us adopt during the day.[2]
Parivrtta janu sirsasana is also effective in improving the external rotation of the hip and the health of the hip joint.
Hip instability often causes lower back pain
How to do Revolved Head to Knee Pose
- Sit on the floor, with the legs stretched straight in front of you assuming a dandasana position.
- Bend the left knee and move it to the left, keep the outer side of the left thigh and the left calf on the floor.
- Place the left heel against the inner part of the left thigh near the pelvis. The big toe on the left foot should touch the inner right thigh. Stretch the left knee as far back as possible.
- Twist the trunk to the left.
- Stretch the right arm toward the extended right leg. Hold the inner side of the right foot with the right hand.
- Turn the trunk back, stretch the left arm over the head, hold the wrist up and hold the outer side of the extended right foot with the left hand.
- Exhale, turn the trunk upwards and rest the back of the head on the right knee. Try to touch the inner side of the right knee joint with the back of the right shoulder so that the back of the ribs on the right side rests on the right knee. Extend the bent left knee further and try to twist the chest upwards even more.
- Maintain the pose for around 20 seconds. The breathing will be short and fast due to the abdomen contracting.
- Release your foot and lift your upper body upright. Stretch the legs back out long before you to return to dandasana, and before repeating on the opposite side.[5]
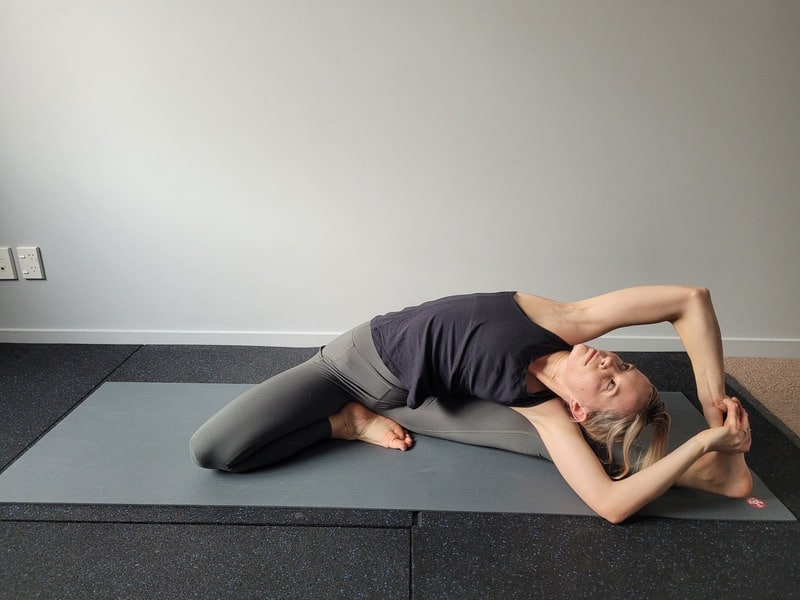
Variation of Revolved Head to Knee Pose
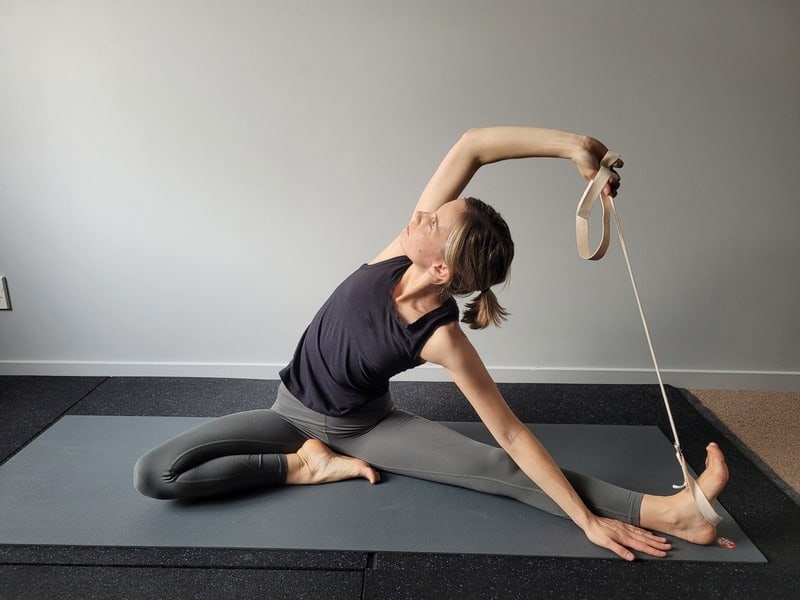
Use a strap to connect the hands to the foot.[12]
Iliopsoas
The iliopsoas is a combination of the psoas major muscle, which originates from the lower spine, and the iliacus muscle, which originates from the inside of the pelvis.
The two muscles join together to form the iliopsoas, which inserts into the femur bone of the thigh, acting like a pulley to multiply the force generated by the muscle.
The primary function of the iliopsoas is to flex the hip joint, bringing the thigh towards the abdomen, and it also helps to stabilise the lower back and pelvis during movement.[1]
Tightness in the iliopsoas muscles can pull the pelvis forward and upward, which can cause excessive curvature of the lumbar spine, often referred to as lumbar lordosis.[13]
One Foot King Hanuman — Eka Pada Rajakapotasana 4
Eka = one, pada = foot, raja = king, kapota = pigeon
In our previous article, we discussed how eka pada rajakapotasana can help prevent and alleviate back pain. Following this, we introduce eka pada rajakapotasana 4, which can further deepen hip flexibility by activating the iliopsoas muscles.[2]
When the iliopsoas muscles are tight, they can exert force on the sciatic nerve. By enhancing the flexibility of the iliopsoas, the pressure on the nerve can be reduced.
Eka pada rajakapotasana 4 can stretch the iliopsoas, reducing the risk and easing the discomfort of sciatica.[14]
Additionally, as you bring yourself into the back bend, the muscles supporting the shoulders and spine are fully expanded, countering the effects of poor posture.[5]
Stretching the iliopsoas can help relieve sciatica
How to do One Foot King Hanuman Pose
- Start on all fours. Bring the right leg forward and the left leg back and stretch both legs straight with an exhalation, bringing you into hanumanasana (forward splits).
- Push the chest forward, extend the neck and lift the head as far back as you can. Bend the left knee and take the left foot up near the head. The left shin from knee to ankle should be perpendicular to the floor.
- With the exhalation, take the left arm over the head and grab hold of the left foot with the left hand. After taking a few breaths, exhale again, take the right arm over the head and grab the left foot with the right hand.
- Deepen the back bend so that your left foot can touch the head.
- Hold for 10 seconds.
- Release the grip and lower the left foot back to the ground to return into hanumanasana.[5]
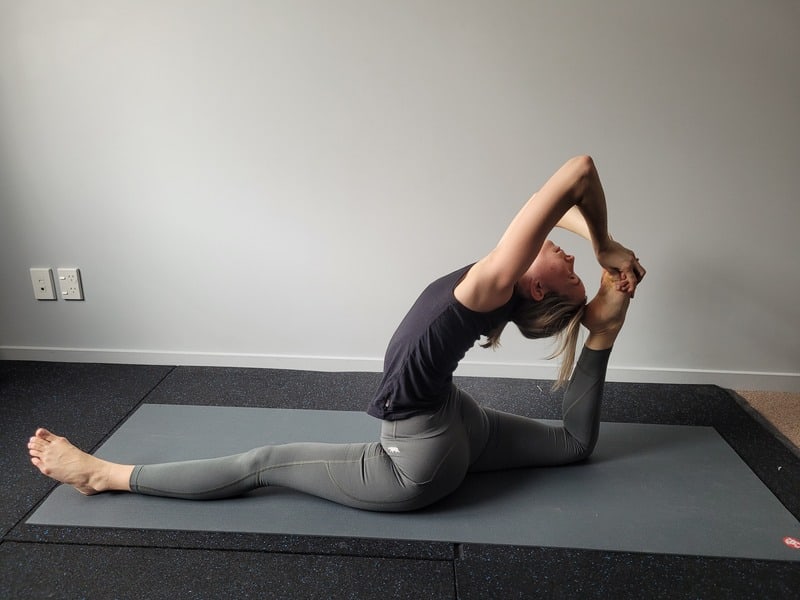
Variation of One Foot King Hanuman Pose
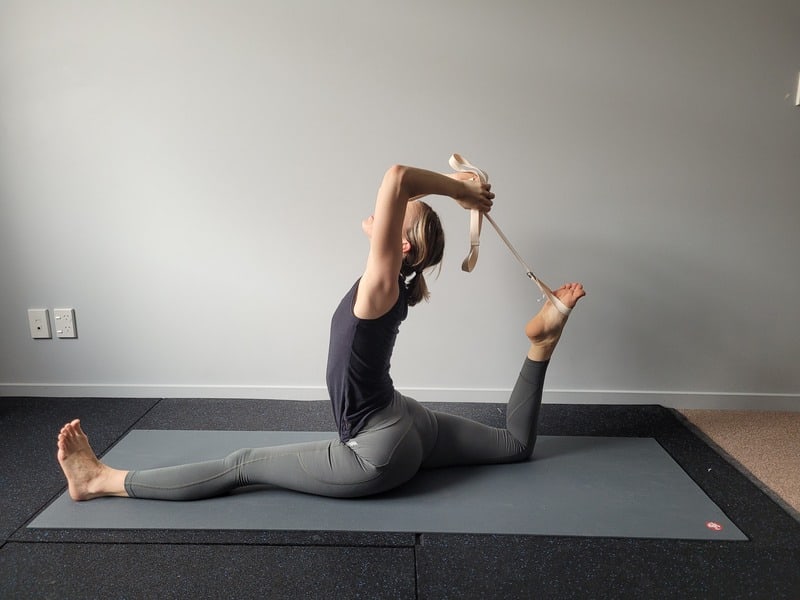
Pigeon — Kapotasana
Kapota = pigeon
Kapotasana is a deep back bend that can be beneficial for increasing the flexibility of the spine and hip flexors, including the iliopsoas muscles.[2]
This is important, as tight hip flexors can lead to imbalances in the body, creating tension in the lower back.
Flexible hip flexors aid in reducing stress
Regular practice of kapotasana can improve posture and alignment, which can positively impact the health of the spine and surrounding muscles.[7]
In addition, kapotasana can help stimulate the nervous system, promote relaxation and reduce stress levels. This can be especially beneficial for people suffering from chronic back pain or discomfort due to stress and tension.[16]
How to do Pigeon Pose
- Sit in virasana (a kneeling position).
- Recline back into supta virasana. Stretch the arms over the head, place the palms on the ground in line with the ears with the fingers pointing to the shoulders. Allow the elbows to point upwards.
- Stretch the arms and raise the whole body from the knees up off the ground.
- Contract the buttocks, stretch the entire spine, bend the elbows and bring your hands to hold your toes.
- Then rest the elbows on the floor. Breathing will be very fast and laboured as the diaphragm is fully contracted.
- Take a few quick breaths. Gradually bring the hands near the heels and catch them by bringing the head towards the feet. Now place the crown of the head on the soles of the feet.
- Walk your hands back off your feet, and slowly lower the spine on to the mat bringing you back into supta virasana.
- Press the palms into the ground by your side and lift your upper body back up to bring you back into virasana.[5]
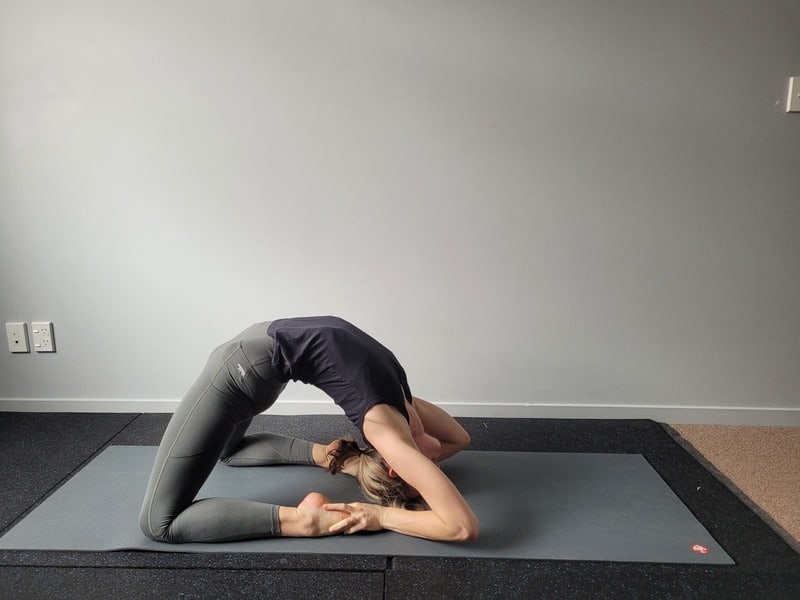
Variation of Pigeon Pose
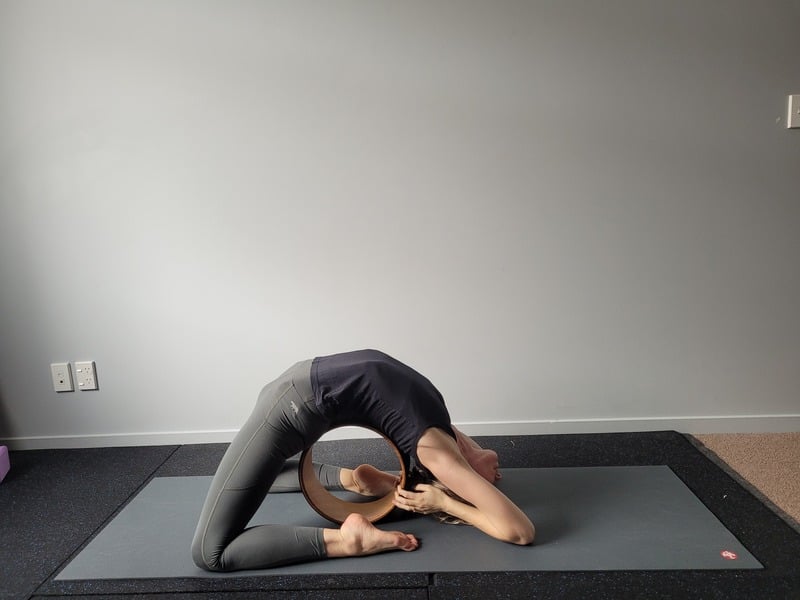
Rest the spine on a yoga wheel and grab hold of the wheel instead of your feet.[17]
Summary
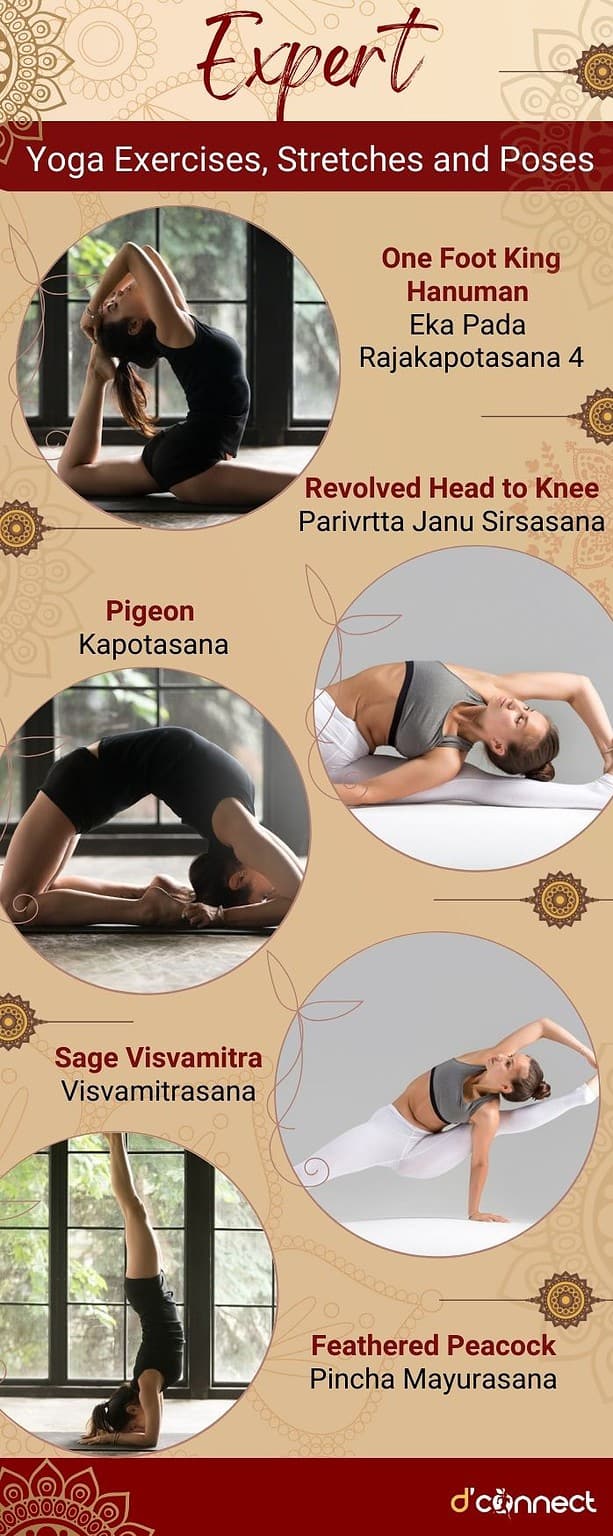
Note — feel free to print or share this illustration.
Related Questions
1. Should I be doing all of these poses on a daily basis, or is that too much?
It depends on your level of strength and flexibility. If these poses are hard for you, then you should allow your body to rest and recover before performing them again.
2. How is yoga different from other forms of exercise?
Yoga is a physical and mental practice. Within the physical practice, there are hundreds of different poses that allow you to work your entire body to increase range of motion and strength.
3. Is there a recommended time of day to do yoga?
The best time to practice yoga depends on personal goals.
A strong morning practice to boost energy, a midday practice offers a break from a busy day, and a slow evening practice promotes relaxation for better sleep.
There has been a full series of yoga poses to help back pain. If you are just joining us, we suggest starting from Relieve Back Pain: 5 Beginner Yoga Exercises.
Rachael first started practicing Hatha Yoga in 2014, and since 2017 has been focused on the Iyengar method, where she learned the importance of alignment and precision in asana, and creating yoga as a discipline.
Rachael is passionate about bringing the meaning of yoga and its practice into the community to create freedom from dis-ease in the body and mind. This is why she is continuously improving and evolving as a teacher and is currently in the process of completing CYT 300 teacher training certificate.
References
(1) Long, R. (2006). The Key Muscles of Yoga. Bandha Yoga Publications LLC.
(2) Kaminoff, L., & Matthews, A. (2011). Yoga Anatomy (Second). Human Kinetics.
(3) BSc, A. R. (2023, April 12). Erector spinal muscles. Kenhub. Retrieved from https://www.kenhub.com/en/library/anatomy/erector-spinae-muscles
(4) Chiropractic, C. (2021). 6 Most Common Causes of Poor Posture Shared By Our Stoke Chiropractor. City Chiropractic Clinic. Retrieved from https://city-chiropractic.com/chiropractor-stoke-on-trent/6-common-causes-poor-posture-shared-stoke-chiropractor
(5) Iyengar, B. K. S. (2022). Light on Yoga: The Definitive Guide to Yoga Practice. HarperCollins UK.
(6) Roads To Bliss. (2015, January 30). Gabriella Giubilaro teaching Pincha Mayurasana in the Iyengar Tradition [Video]. YouTube. https://www.youtube.com/watch?v=oCNDa8uoBA4
(7) Latissimus Dorsi Muscle. (n.d.). Physiopedia. Retrieved from https://www.physio-pedia.com/Latissimus_Dorsi_Muscle
(8) Cronkleton, E. (2019, June 3). 10 Ways to Stretch and Strengthen Your Lats. Healthline. Retrieved from https://www.healthline.com/health/lat-stretches#yoga-stretches
(9) Roudabush, K. (2019, March 21). Seated Lateral Bends | Functional Pathways | Therapy that exceeds expectations.
(10) Moves, A. (2021). How to do Modified Visvamitrasana Pose in Yoga — Alo Moves. Alo Moves. Retrieved from https://blog.alomoves.com/movement/fun-pose-friday-modified-visvamitrasana
(11) Clark, A. (2021b). Back pain on one side? It could be coming from your hip. Clinical Physio St Ives. Retrieved from https://clinicalphysiostives.com.au/blogs/back-pain-on-one-side-it-could-be-coming-from-your-hip/
(12) Roads To Bliss. (2020, November 7). Everything about Parivrtta Janu Sirsasana with David Meloni [Video]. YouTube. https://www.youtube.com/watch?v=9rUBbuIwIdI
(13) Psoas Muscle and Lower Back Pain | PhysioLogic. (n.d.). Retrieved from https://physiologic.com.au/psoas-muscle-lower-back-pain/
(14) Sita. (2023). Stretches for Sciatic Nerve Pain. Bendable Body. Retrieved from https://bendablebody.com/stretches-for-sciatic-nerve-pain/#:~:text=When%20the%20psoas%20major%20is,pain%20is%20something%20very%20different!
(15) Eva. (2023). Monkey Pose or Full Splits Pose. YogaUOnline. Retrieved from https://yogauonline.com/yoga-poses/monkey-pose-or-full-splits-pose/
(16) Clark, N. (2019). Open Your Heart: Understanding Backbends and The Vagus Nerve. Breathe Together Yoga. Retrieved from https://breathetogetheryoga.com/yoga/open-your-heart-understanding-backbends-and-the-vagus-nerve/
(17) Pigeon Pose Wheel Yoga (Kapotasana Wheel) | Yoga Sequences, Benefits, Variations, and Sanskrit Pronunciation | Tummee.com. (n.d.). Tummee.com.

