Rachael Cooper
Certified yoga instructor (Vinyasa and Hatha Yoga), CYT 200 teacher training certificate
In our previous article, Relieve back pain: 5 Intermediate Yoga Exercises, Stretches and Poses, we focused on strengthening the muscles supporting the spine, and introduced flexibility to help alleviate pain and discomfort.
In this article, we bring more attention to the types of spinal movements of extension and axial rotation, veering away from the forward bending that is prevalent in modern lifestyles contributing to poor posture.
We also introduce inversion to relieve the weight that the spinal discs are forced to retain.
Back extension (Backbends)
Many tasks we do every day are sedentary or require us to bend forward. All these factors contribute to:
- poor posture
- muscle weakness
- and back problems
The strong spinal extension of backbends encourages the spine and back muscles to increase their range of motion and maintain the health of the vertebrae and spinal disks.[1]
Backbends are beneficial in back pain prevention
Word of caution
Backbends should be avoided if you have hypertension or hypotension. Also, backbends should be practiced after warming up the body, not at the beginning of a yoga session.[2]
Compression in the lower back should be avoided. If compression occurs, lift and expand the chest.[3]
One-Legged King Pigeon Pose — Eka Pada Rajakapotasana
Eka = one, pada = foot/leg, raja = king, kapota = pigeon
Eka pada rajakapotasana takes us into deep spinal and hip extension. Posture is improved with regular practice as the shoulders are fully expanded and the chest can open.
This position allows us to strengthen the pectoralis minor muscles, which help prevent the shoulders from rounding forward and becoming hunched.
In addition, this helps alleviate pain and tension in the upper back.[4] To assist stability, the hip flexors actively engage and the hip extensors are stretched.[5]
How to do One-Legged King Pigeon Pose
1. Start in ardho mukha svanasana (downward facing dog pose).
2. Bring the left leg forward and position the left knee behind the left hand and the left foot behind the right hand. The left knee should be bent at about a 45-degree angle.
3. Lower both hips to the ground and slide back the right leg. The right foot should align directly with the right hip.
4. Put your hands on your waist, push your chest out, and extend your head and neck back. Maintain this position for a moment, focusing on stability and expanding the chest.
5. Release the hands and maintain the back bend while you raise the right foot off the ground. Engage the thigh muscles to hold the right leg in a 90-degree position.
6. Lift the left hand off the ground and bring it up and over to grip the right foot. Keep this position for a moment, then raise the right arm upwards and over to grip the foot.
7. Use the right leg as leverage, bend the back further and grip the right ankle.
8. Hold for 5 to 10 breaths.
9. Release the hands one by one, placing them on the ground. Straighten the right leg and bring it around to the front. Straighten through the left leg, bringing you into dandasana (staff pose).[6]
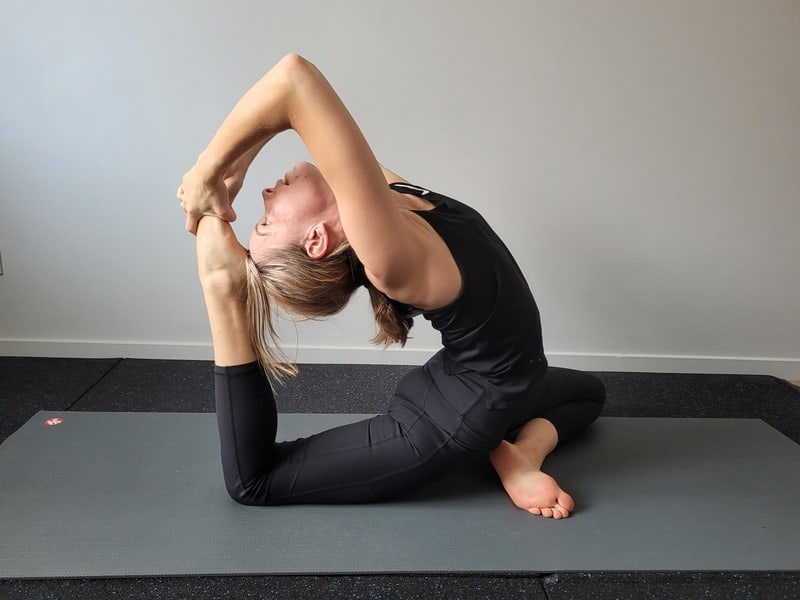
Variations One-Legged King Pigeon Pose
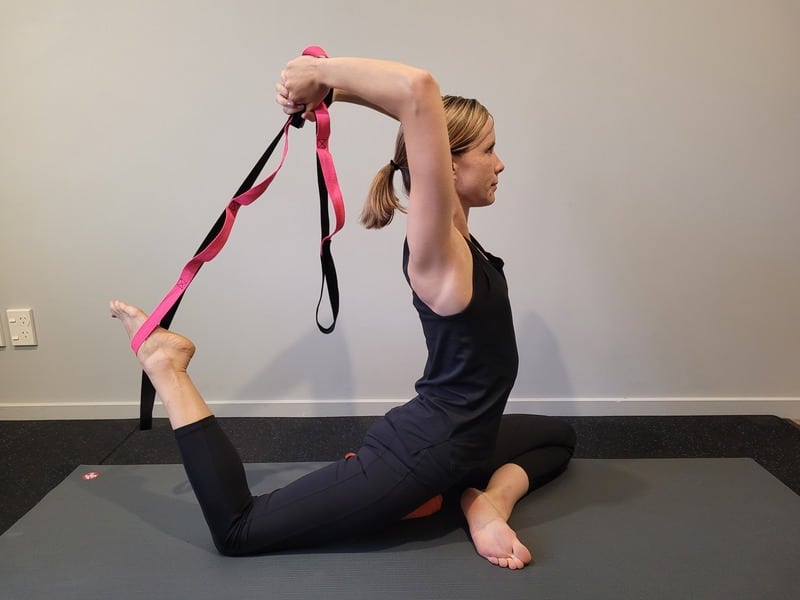
If stability cannot be maintained, try placing a blanket under the perineum.
Another option is to connect the strap to connect the hands with the foot.[3]
Upward Bow — Urdhva Dhanurasana
Urdhva = upward, dhanu = bow
In this pose, the chest and shoulders are fully expanded, allowing the cervical and thoracic spine to extend as much as possible, which is a movement we hardly do in our daily activities.
The spine can fully stretch, which is an effective way to boost energy.[6]
The spinal extensors are engaged to allow a maximum extension of the spine, and the psoas and abdominals keep the lumbar spine safe.[7]
How to do Upward Bow
1. Lie on the floor on your back.
2. Bend the knees and bring the heels close to the buttocks.
3. Raise your arms overhead and place the palms on the ground on either side of the head or under the shoulders. The fingers should point towards the feet.
4. Lift the hips off the floor and place the crown of the head on the ground. Hold this position for a few breaths.
5. Push off the floor with your palms to lift the hips higher and straighten the arms. Gaze towards your hands.
6. Push the chest out fully and start to straighten through the legs.
7. Hold for 5 to 10 breaths.
8. To release from the asana, bend the elbows and knees to put the crown of the head on the ground, before lowering the back on the ground.[6]
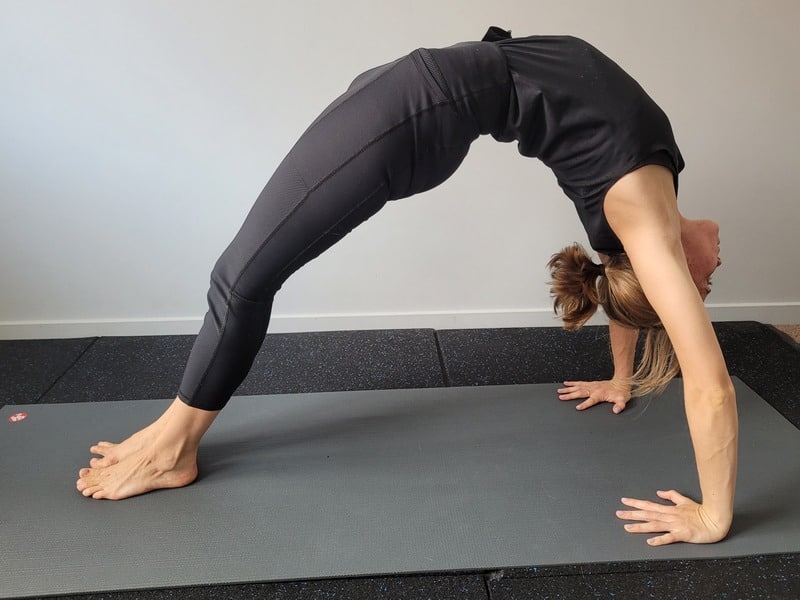
Word of caution
If the muscles around the pelvis are not flexible enough, the weight will move forward to the upper body. This makes it hard to lift the body and will result in excessive pressure on the shoulder joint.[7]
Variations of Upper Bow
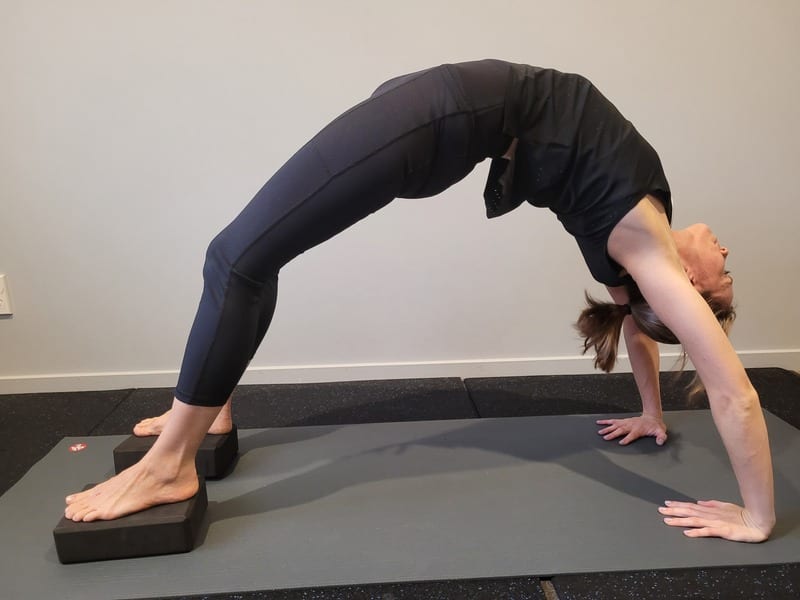
If the hips are tight, try placing a block under each foot. In case your shoulders are tight, place a block under each hand.[8]
Axial rotation (Twists)
Spinal twists are often recommended to relieve pain and tightness in the lower and mid-back.[7]
Flexibility is important for our range of motion as it protects our body from injury and reduces stress in the muscles. When we have a decreased range of motion, we put more pressure and stress on our bodies.
The axial rotation and lateral extension increases the flexibility of the back muscles and stimulates circulation and blood flow, especially around the lower part of the spinal region.
This makes it favourable for people with muscle pain in the lower back.[6,9]
Revolved Triangle — Parivrtta Trikonasana
Parivrtta = revolved, tri = three, kona = angle
Parivrtta trikonasana brings us into axial rotation of the spine, increasing the flexibility of the surrounding muscles.
A lack of hip mobility can have a significant impact on developing lower back pain. When the hips lack mobility, the spine compensates.
Parivrtta trikonasana increases strength and flexibility in this area. The front leg will experience the most hip flexion, but the back leg will still have some mild flexion.[7]
How to do Revolved Triangle
1. From tadasana, spread the legs apart, and raise the arms out to the side in line with the shoulders.
2. Turn the right foot 90 degrees to the right and the left foot 60 degrees to the right.
3. Rotate the upper body to the right. Bring the left hand towards the floor outside the right foot as you continue twisting the trunk.
4. Lift the left hand up, keep it in line with the shoulder, and turn the head to look towards the left hand.
5. Keep the head in line with the spine.
6. Stay in the asana for 5 breaths.
7. Lift the left hand off the floor and rotate the upper body into the original position.[6]

Word of caution
The movement of the spine should be axial rotation. It’s important to avoid the spine moving into flexion. This is often caused by a lack of flexibility in the legs and pelvis.[7]
Variations of Revolved Triangle
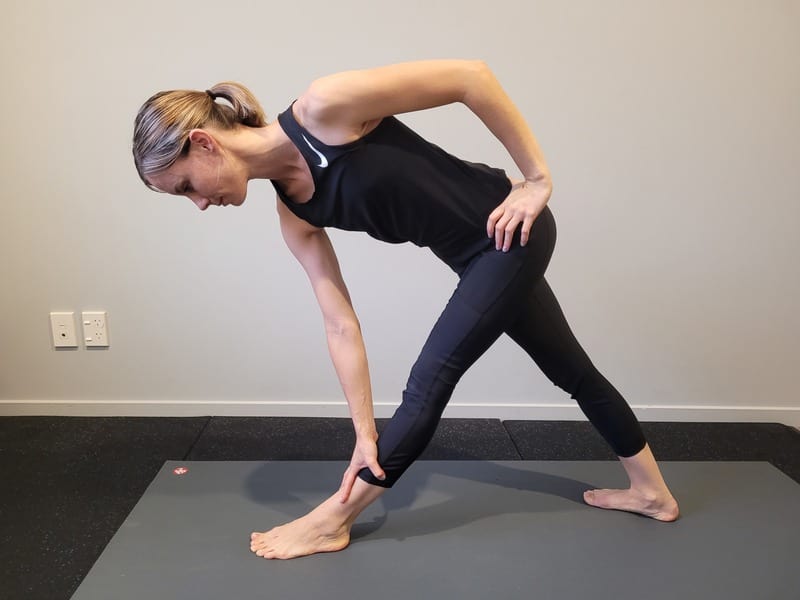
Rather than placing the hand on the ground, rest the hand on the big toe side of the foot, or the shin.
The upper hand can be placed on the sacrum, while your gaze can be facing downwards.[3]
Sage Twist — Marichyasana 3
Marichi = ray of light (a sage)
The back muscles, particularly the spinal extensors, are strengthened in this pose. These muscles are crucial to helping us stand up and lift correctly.
The muscles in our abdominal area are strengthened when we bring and hold ourselves in the rotation position. This asana opens the chest and shoulders, aiding in good posture.[5]
How to do Sage Twist
1. Start in a seated position with the legs together out long in front of you. Bring the right knee in close to the body. Place the right foot on the ground in front of the right sit bone with the toes pointing forwards.
2. Put your left hand on your right knee, extend through the upper body and rotate the upper body to the right. Using the left hand on your right knee to leverage you deeper into the twist.
3. Bring the left elbow over the right knee and allow the armpit to rest as close to the outer knee as possible.
4. Maintain length through the upper body and wrap the left arm around the right knee so the left hand is near the left hip.
5. Open through the right side of the chest and right shoulder as you wrap the right arm around the back.
6. Take the right hand with the left, and look towards your left leg. Stay in this position for 10 breaths.
7. Release the grip of the hands and rotate back to the centre. Straighten through the right knee to return into dandasana.[3]
Word of caution
Since there is a lot of pressure on the abdominal organs, Marichyasana should not be practised immediately after eating or when suffering from digestive problems.[10]
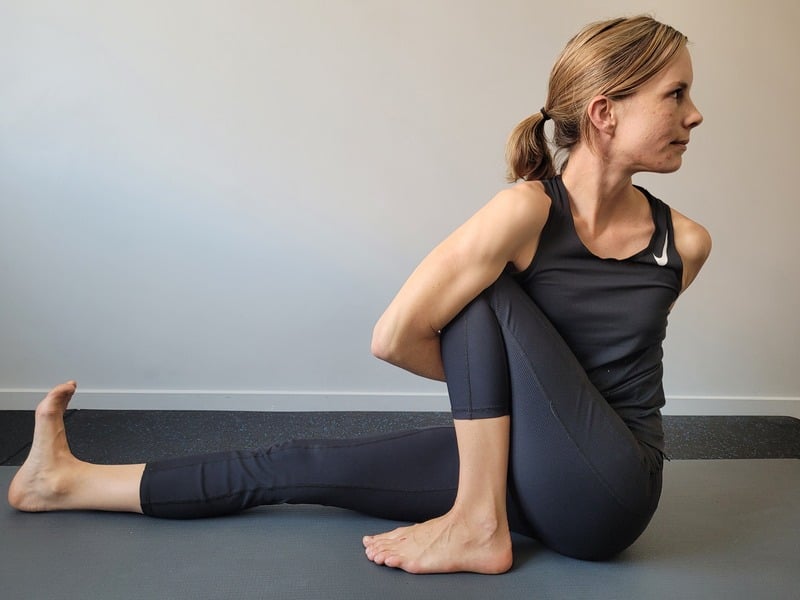
Variations of Sage Twist
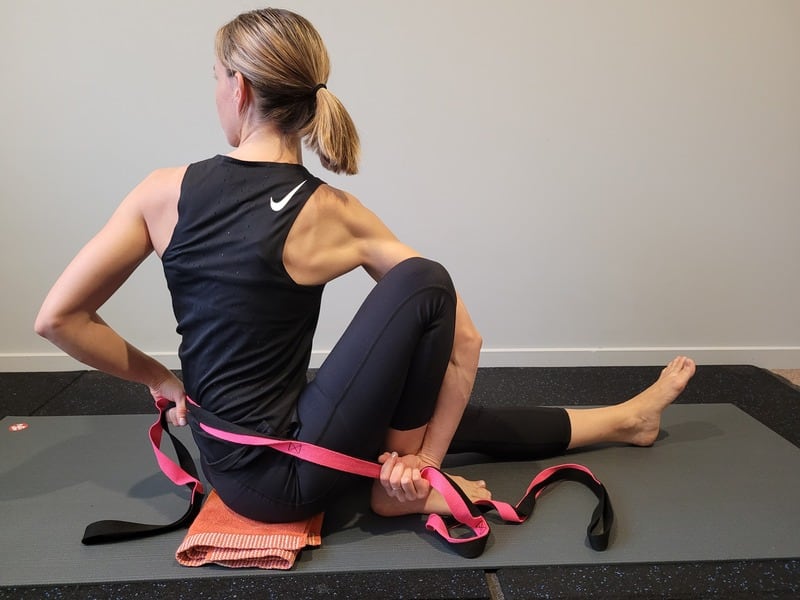
Sitting on a blanket can help if the upper body cannot be lengthened or the hips cannot sit evenly on the ground.[10]
Also a strap can be used to link the hands behind the back.[3]
Inversions
In complete inversions, the sympathetic nervous system is activated and the heart rate is reduced. This helps relieve tension in the back muscles caused by unnecessary stress.
The mental benefits of inversions increase with the time spent in the asana and with frequent practice.[11]
Weight-bearing tasks such as:
- sitting
- standing
- exercising
stress our spinal discs. Disc hydration plays an important role in absorbing shock, transmitting load across the spine and providing flexibility.
Weight-bearing tasks cause a reduction in fluid in the discs. This reduces the distance between each vertebrate and affects the function of the spinal discs. This is one of the most common causes of back pain.
Inversions give the discs a break from bearing weight
In addition, it relieves pressure on the ligaments and nerve roots surrounding the spine.[12]
The muscles of the core and those around the spine work together to support the spine and take on the load during weight-bearing tasks.
Accordingly, strengthening these muscles will help prevent disc fluid reduction.[13]
Supported Headstand — Salamba Sirsasana
Sa = with, alabama = support, sirsa = head
In yoga, sirsasana is one of the most important asanas. Practising it with correct alignment and ease, will result with releasing of the tension, both mentally and physically.[6]
Sirsasana is referred to as the king of yoga asanas
Word of caution
Salamba sirsasana should not be practised if you have cervical spondylosis or hypertension. Correct alignment is important, therefore it should not be practised if muscles are weak or unable to contract.[10]
How to do Supported Headstand
1. Interlace your fingers and place your forearms on a blanket with the elbows no wider than your shoulders to form a triangle.
2. Place the back of the head between the wrists, and rest the top of your head on the floor.
3. Tuck your toes, and straighten your knees to form an inverted “v” shape.
4. Move your feet closer to your head, distributing weight to your head.
5. Lift the feet off the ground and straighten through the legs.
6. Stay in salamba sirsasana for 5 breaths or up to 10 or more minutes.[3]
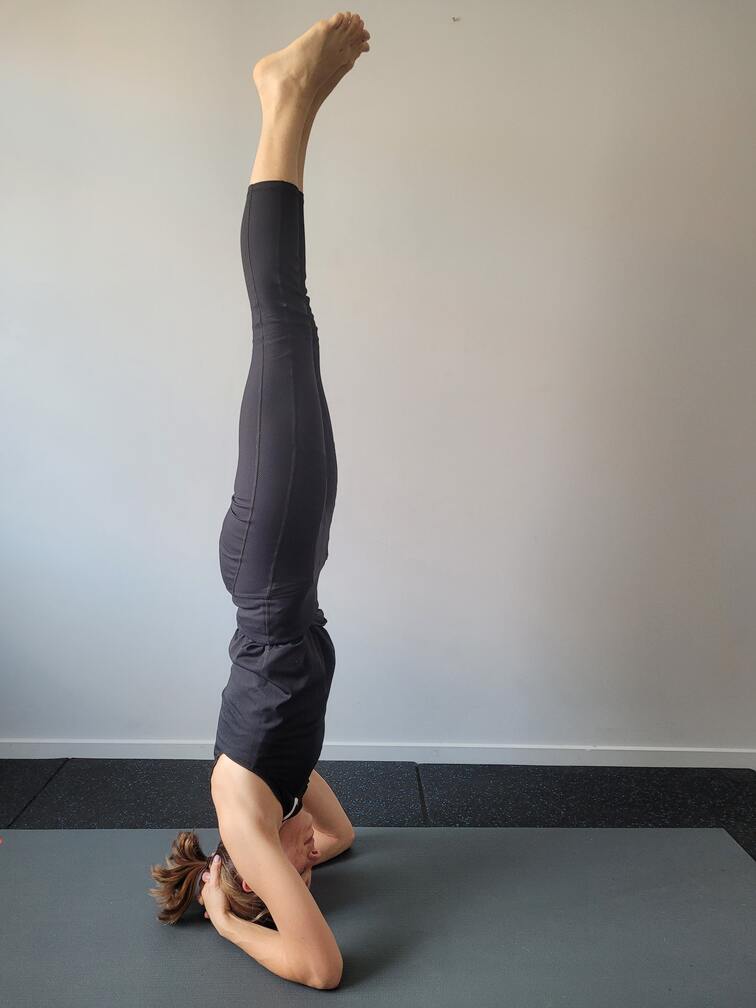
Variations of Supported Headstand
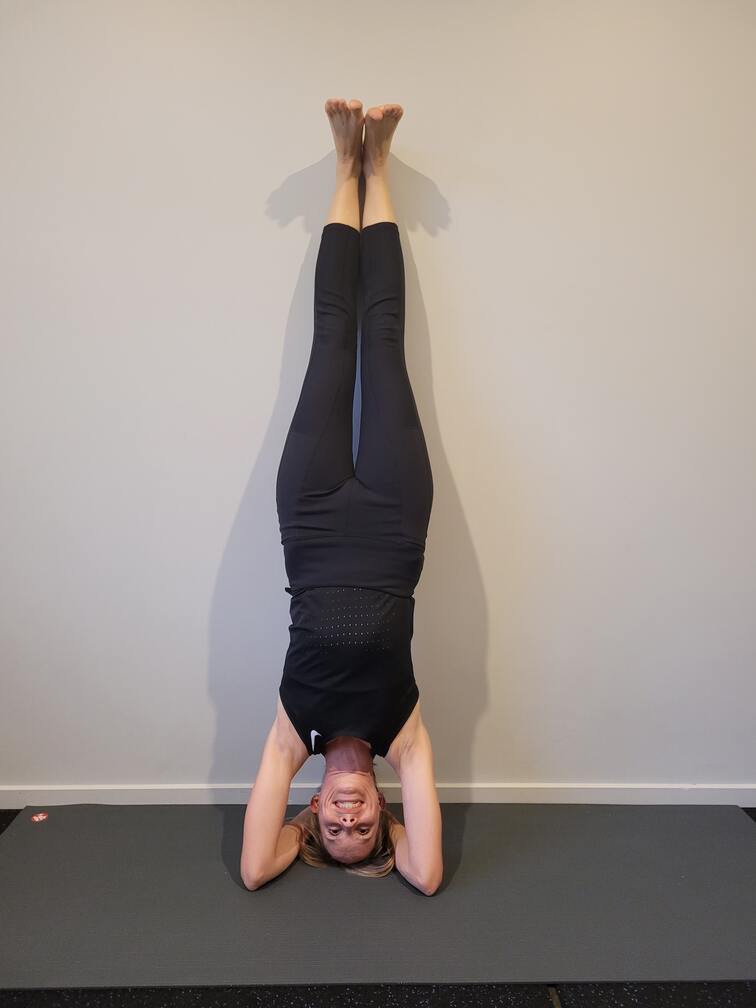
Practise against a wall or with an experienced yoga teacher.[3]
Summary
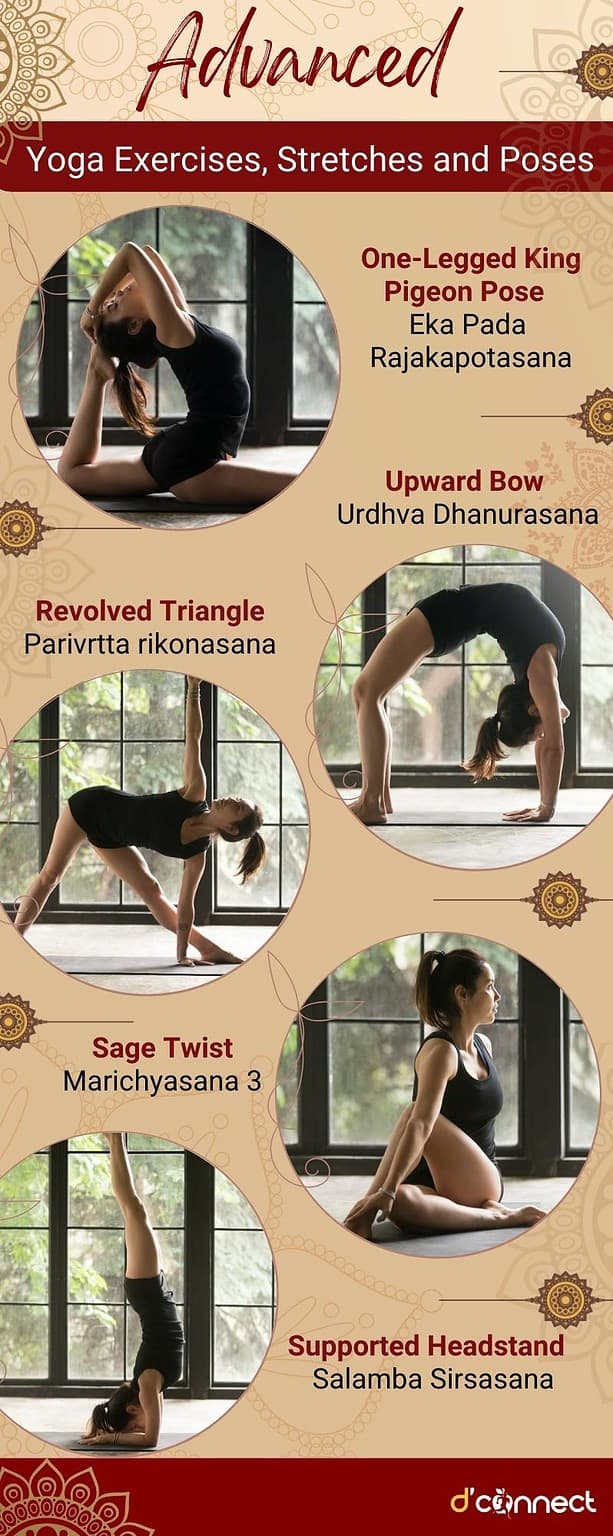
Note — feel free to print or share this illustration.
Related Questions
1. Is spine extension the same as back extension?
There is a difference between spine extension and back extension.
Spinal extension refers to the movement of the spine into an arched position. In spinal extension, the cervical, thoracic and sacral areas of the spine move out of their natural curvature into an arch and the natural arch in the lumbar spine is increased.[7]
Back extension refers to the muscles that support the spine to move into the arched position. These muscles include the erector spinae, the quadratus lumborum, the lower trapezius, the gluteus maximus and the hamstrings.[15]
2. What are the 4 spinal movements in yoga?
The four types of spinal moves include:
- flexion (forward bending)
- extension (backward bending)
- axial rotation (twisting)
- lateral flexion (side bending).[7]
3. Can a headstand cause vertigo or make me dizzy?
Dizziness or benign paroxysmal positional vertigo may be experienced if it is your first time doing a headstand, or if you don’t often practise them.
This can be triggered by sudden movements of our head. Dizziness can last around 30 seconds, depending on the severity.[16]
4. Does dizziness go away with regular headstand practice?
Yes. With regular practice, headstands can prevent benign paroxysmal positional vertigo, as well as other types of vertigo related to the inner ears.
If you are prone to dizziness, start with a headstand, where your feet are still on the floor. With time, your head will get used to being upside down, and the dizziness will reduce or stop, allowing you to practise traditional headstands with the feet lifted above the body.[17]
If you are just joining us in this series, the best place to start would be with Relieve back pain: 5 Beginner Yoga Exercises, Stretches and Poses.
Rachael first started practicing Hatha Yoga in 2014, and since 2017 has been focused on the Iyengar method, where she learned the importance of alignment and precision in asana, and creating yoga as a discipline.
Rachael is passionate about bringing the meaning of yoga and its practice into the community to create freedom from dis-ease in the body and mind. This is why she is continuously improving and evolving as a teacher and is currently in the process of completing CYT 300 teacher training certificate.
References
(1) Cronkleton, E. (2022, October 5). Yoga Backbends for Beginners: How to Get Started and How to Progress. Healthline. https://www.healthline.com/health/fitness/backbends
(2) Bending over Backwards: Stay Safe in Your Yoga Practice – Embody Physical Therapy & Yoga. (2012, April 11). https://embodyphysicaltherapy.com/bending-over-backwards-stay-safe-in-your-yoga-practice/
(3) Brown, C. (2017). The Classic Yoga Bible: Godsfield Bibles. Adfo Books.
(4) Long, R., & Macivor, C. (2009). The Key Poses of Yoga. Bandha Yoga.
(5) Swanson, A. (2019). Science of Yoga: Understand the Anatomy and Physiology to Perfect Your Practice. Dorling Kindersley Limited.
(6) Iyengar, B. K. S. (2022). Light on Yoga: The Definitive Guide to Yoga Practice. Macmillan Publishers.
(7) Kaminoff, L., & Matthews, A. (2011). Yoga Anatomy (Second). Human Kinetics.
(8) Ferretti, A. (2021, October 5). 5 Propped Poses to Help You Fall in Love With Backbends. Jason Crandell Yoga Method. https://jasonyoga.com/2016/03/08/props-for-backbends/
(9) Blanchard, J. (2022, October 13). Stretching and Chronic Pain. Twincitiespainclinic. https://twincitiespainclinic.com/stretching-and-chronic-pain/
(10) Iyengar, B. (2013). B.K.S. Iyengar Yoga: The Path to Holistic Health (Revised). DK.
(11) 10 Benefits of a Headstand in Yoga. (2021, November 28). Abstract Fitness. https://abstractfitness.ca/blog/8-benefits-of-a-head-stand/
(12) Auckland Chiropractors & Acupuncturists. (2020, May 18). DFM Gravity Inversion Therapy. Auckland Chiropractors & Acupuncturists. https://www.akchiropractors.co.nz/dfm-gravity-inversion-therapy/
(13) 10 Best Practices to Keep Your Discs From Becoming Herniated. (n.d.). South East Texas Spine. https://www.southeasttexasspine.com/blog/10-best-practices-to-keep-your-discs-from-becoming-herniated
(14). F. (2021, November 28). 10 Benefits of a Headstand in Yoga. Abstract Fitness. https://abstractfitness.ca/blog/8-benefits-of-a-head-stand/
(15) Long, R. (2009). The Key Poses of Yoga. Bandha Yoga Publications LLC.
(16) Rogers, A. (2021, November 7). Can Yoga Cause Vertigo? Advanced ENT & Allergy | Sinus Sleep Thyroid Hearing. https://advancedentpc.com/can-yoga-cause-vertigo/
(17) Mehdi, S. (2023, January 31). 7 Comforting Yoga Asanas That Will Help You Deal With Vertigo. STYLECRAZE. https://www.stylecraze.com/articles/effective-yoga-asanas-to-treat-vertigo/#SalambaSirsasana

